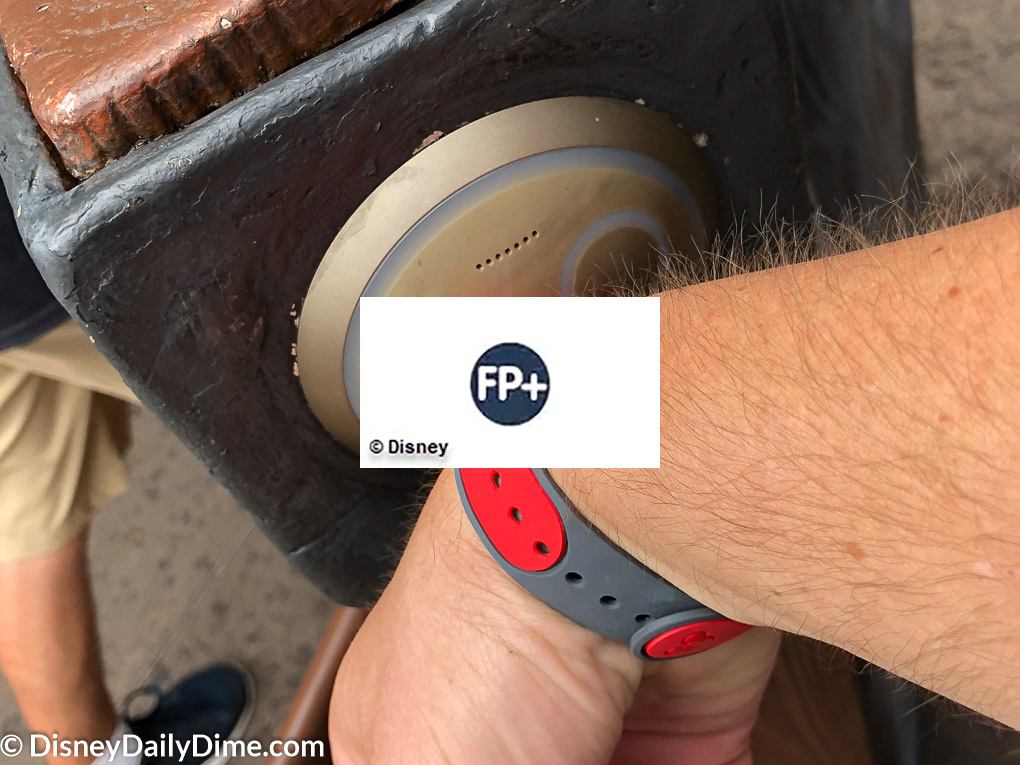
Part of our guide is all about how to do certain things for your Disney World trip. That includes how to navigate the various Disney websites, apps, and the like. In this part we’ll show you how to make a FastPass+ reservation for your trip. We will also give you some tips and tricks we’ve learned along the way. If you’re not familiar with what the FastPass+ system is, you can check out our Disney World FastPass+ article.
A quick note, you can book your FastPass+ reservations on your desktop or laptop computer via the Disney website or you can do it with the My Disney Experience app on your mobile device. In this article we’ll cover both ways. We’ll start with the desktop website and then cover there mobile device app.
Using the Disney Website (My Disney Experience)
Login
Pretty basic we know, but you need to go to the My Disney Experience website and log in. You will need to have a My Disney Experience account to do this. If you’re interested in how to make a FastPass+ reservation, we assume you’ve already done this. If you need a primer on that you can read our article on My Disney Experience. (link to this when done)
Below and to the left is a screen shot of what the website will look like before you log in. Click the sign in button and enter your credentials.
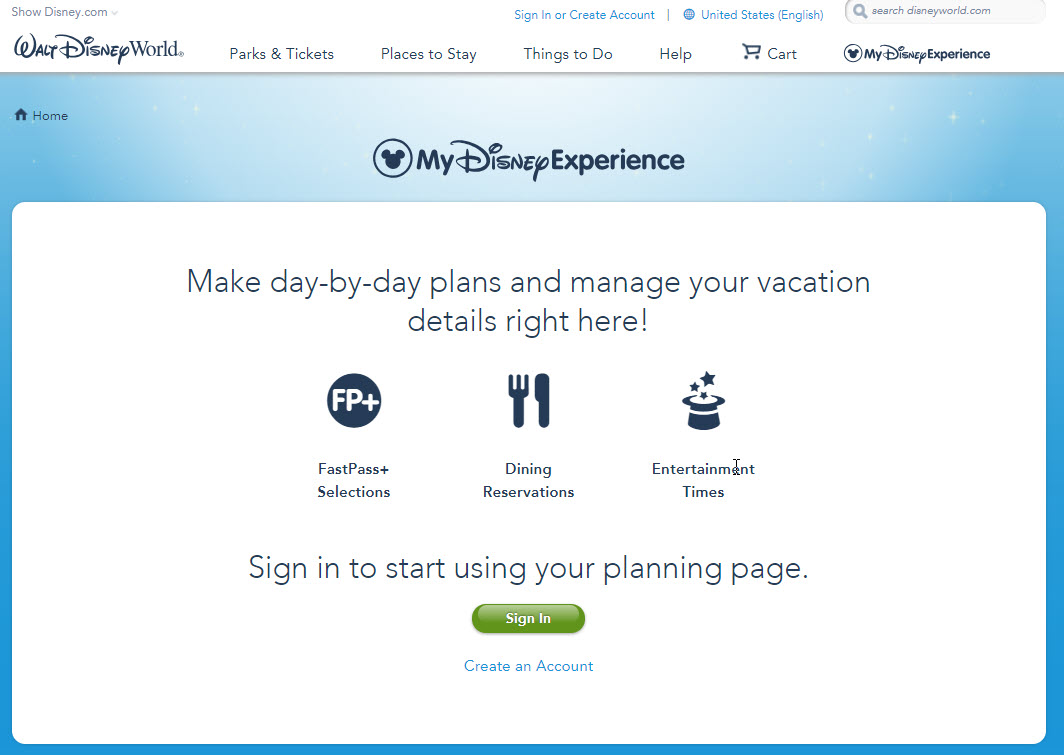

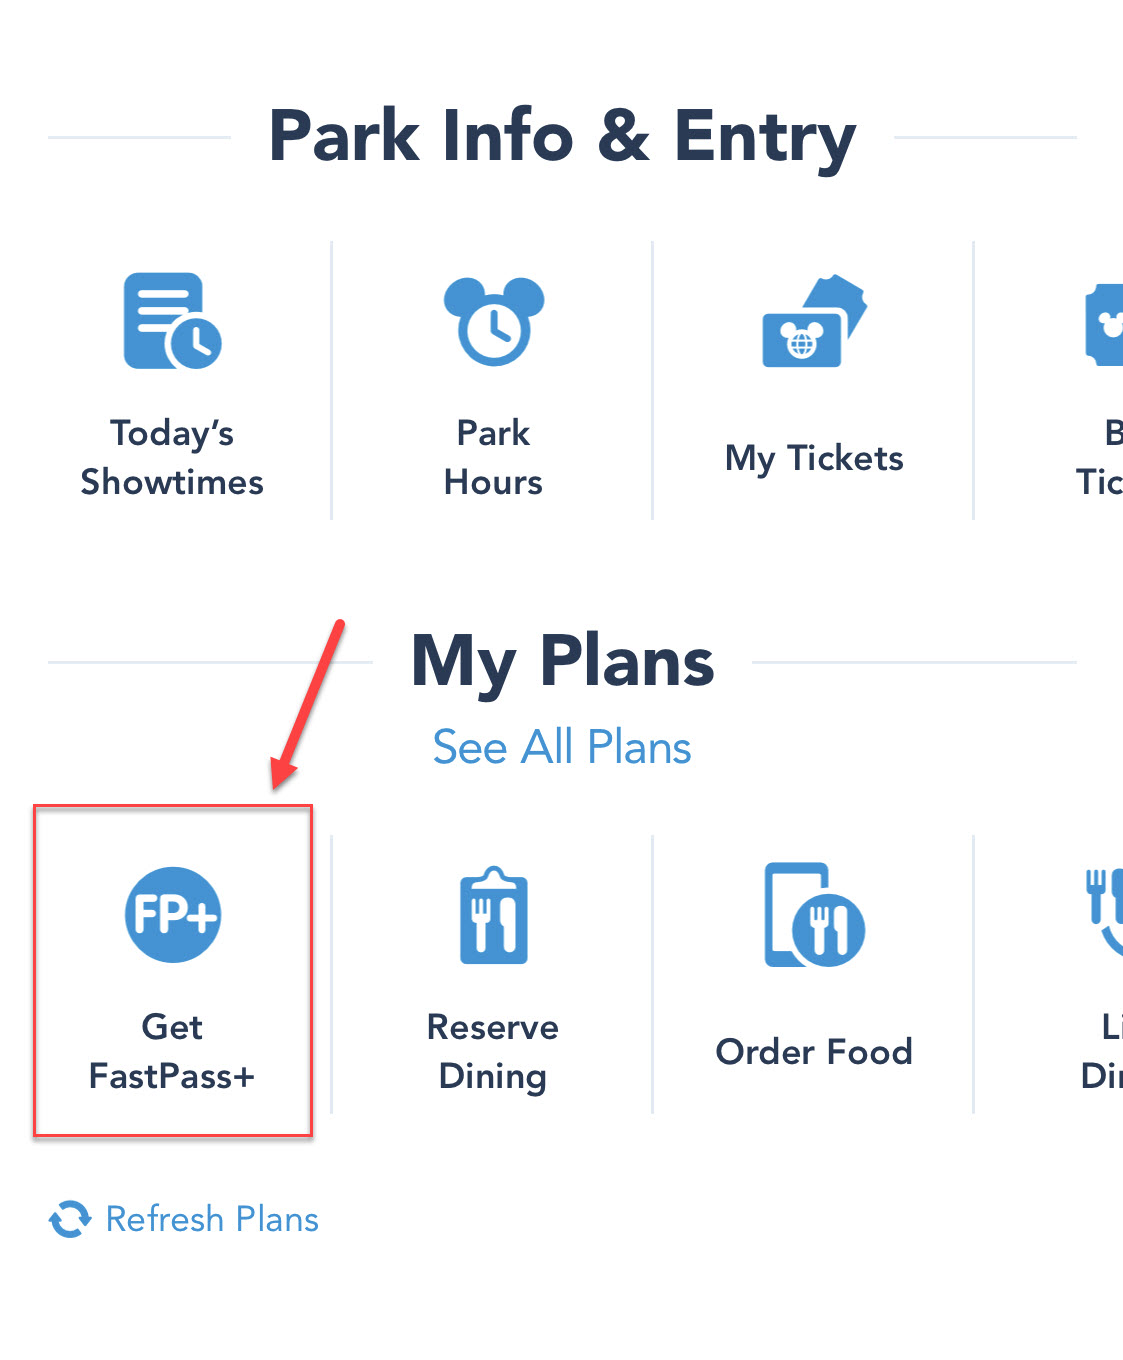
Once you log in you will get a screen that looks like the image to the above and to the right. Click on the “Make Selections” button on under the FastPass+ logo on the bottom left. You can see it with the arrow in the image.
You’ll be taken to another screen that will show any current FastPass+ reservations that you have. Look for the Add FastPass+ button and click it. It should be in the top right of the web page.
Create Your FastPass+ Party
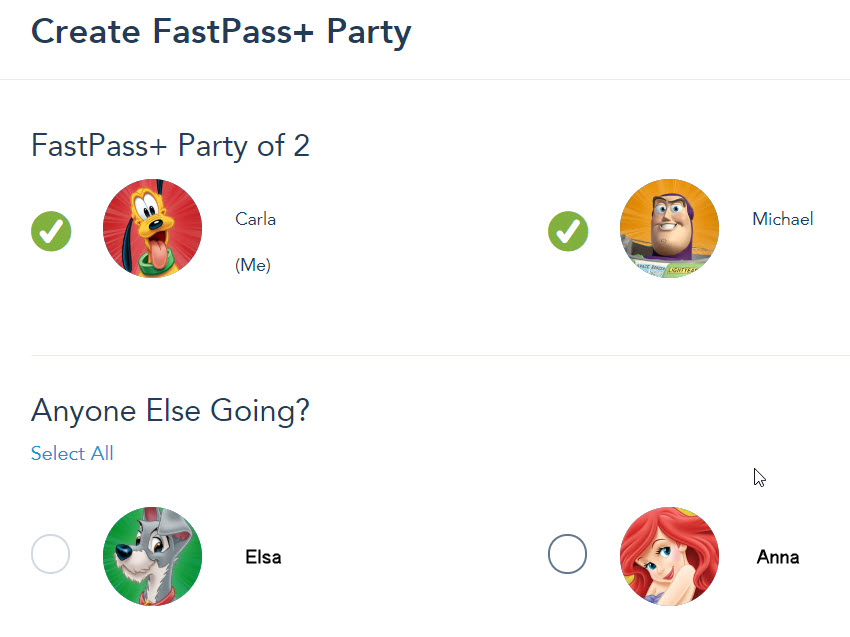
Next you will be given the option to select who all you will make a FastPass+ reservation for. This is your “party”. Note that you don’t have to select everyone that is in your traveling group. Only select those people you are trying to make a FastPass+ reservation for.
You can see that the selections look like on the right. Use the radio buttons to add or remove people from your party.
Pick Your Date and Park
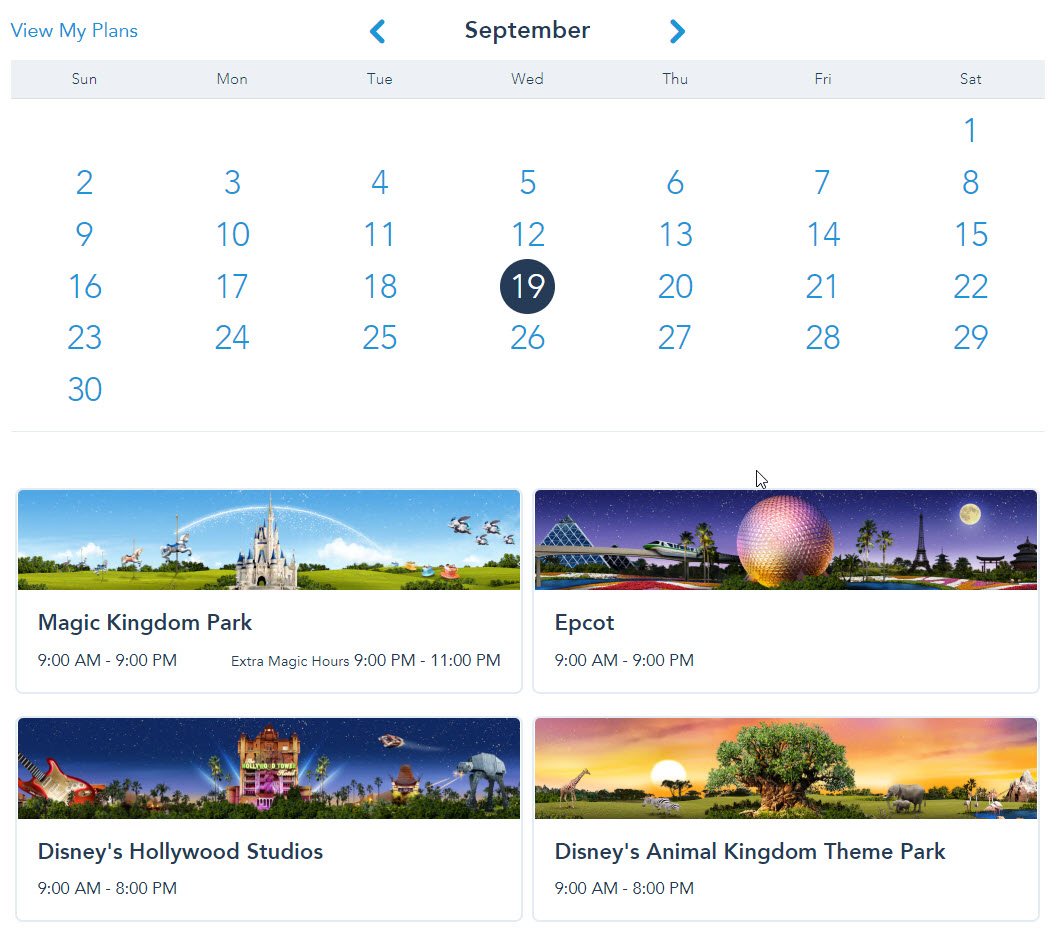
The next screen you see will be a calendar. Scroll through the calendar to pick the appropriate date you want to make a FastPass+ reservation for. Remember, if you are not staying at a Disney World resort you can only make FastPass+ reservations 30 days in advance of your trip. For those of you staying at a Disney World resort, you get a 60 day head start.
Once you pick a date, then you will see park options show up below the calendar. See the image below for what it looks like. For the particular day you have selected, pick the park you want a FastPass+ for. In this instance, we’ll pick Magic Kingdom.
FastPass+ Time Filters
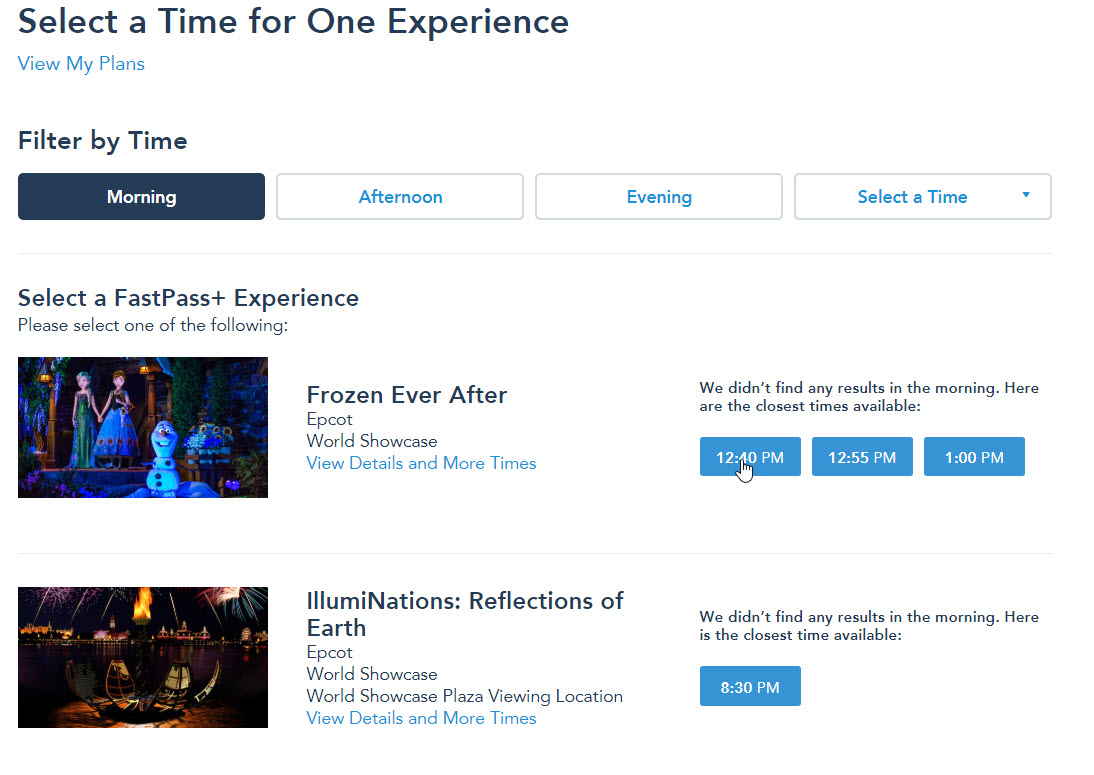
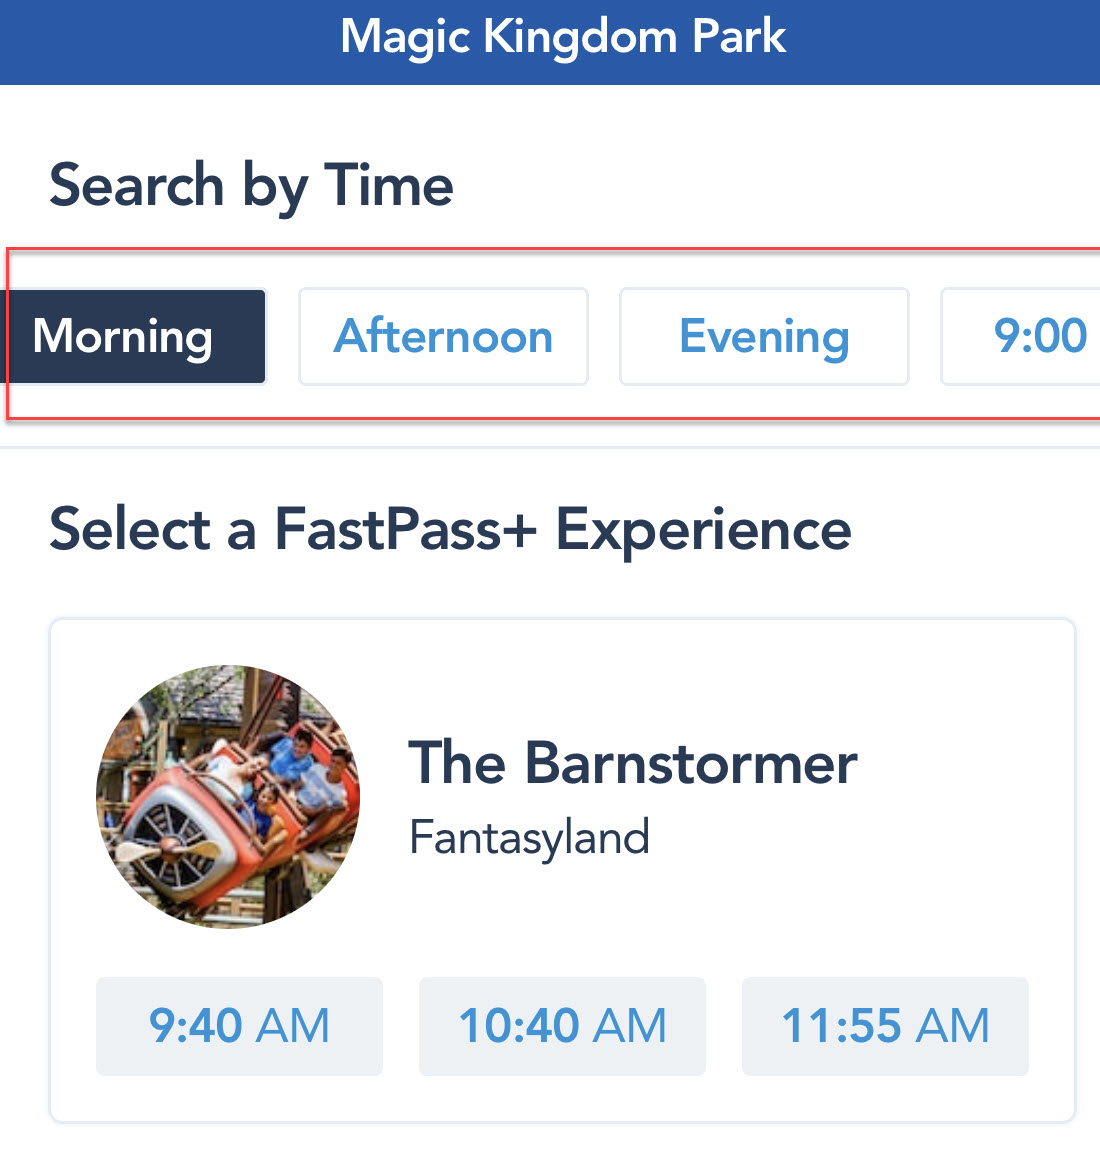
When you get to the FastPass+ selection page, you will see a screen that looks like the image to the right. By default, it will select morning FastPass+ times and display all attractions and three different available times. If you are looking for a specific time window for a FastPass+ reservation, use the “Filter by Time” options on the top. We’ve highlighted the time selectors in red. You can select the more generic morning, afternoon and evening options or a specific time. The specific time windows are set available in 30-minute increments.
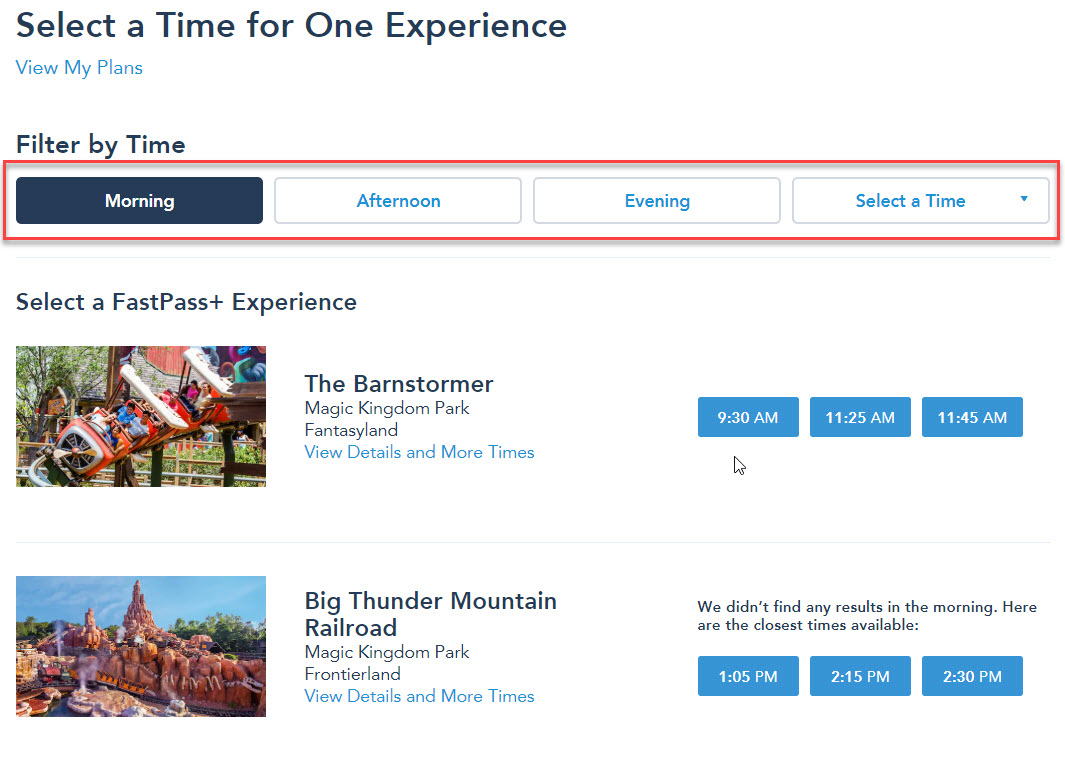
If you are wondering, the morning time selector covers from park opening until 11:59 AM. The afternoon time selector covers from 12:00 PM to 4:59 PM. Finally, the evening time selector covers from 5:00 PM until park close.
If you use the generic morning, afternoon and evening time filter you still get a random set of three options to choose from. We’re really not sure how it chooses what to display. If you pick one of these generic time-frames, but don’t see a time option you want, use the specific time selector. It is very possible that they may be available.
See More FastPass+ Time Options
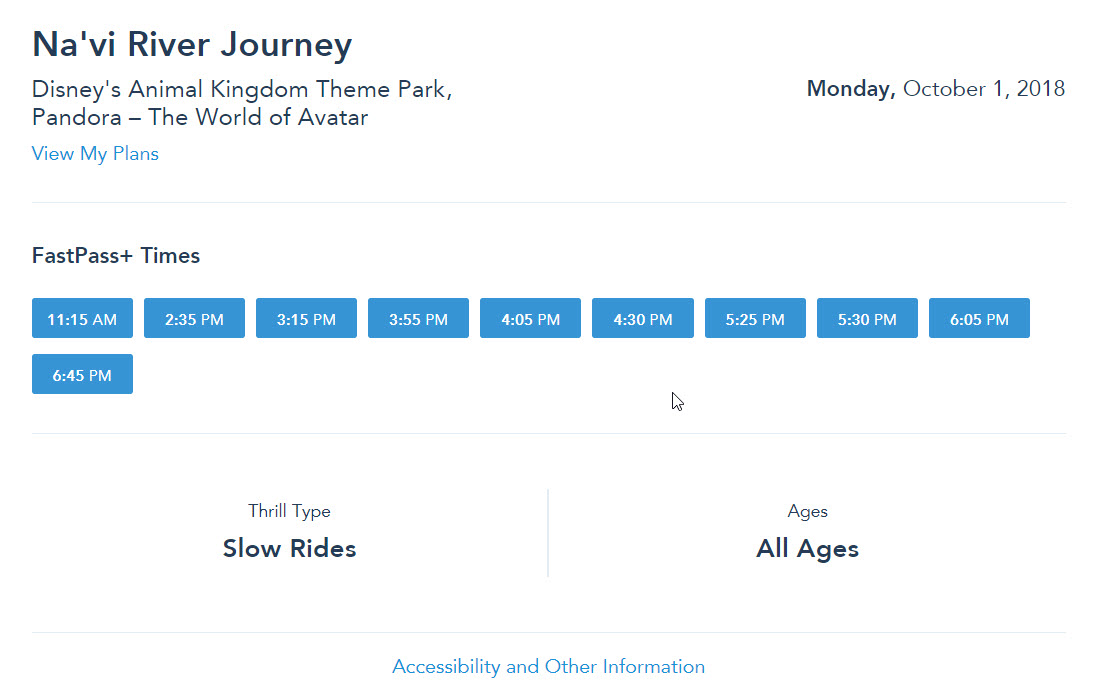
Is seeing just three time options not enough for you? You’re in luck, just click on the attraction name. It doesn’t display as a hyperlink, but by doing so it will open up more detailed information for that attraction. Most important of which is more time options that are available. As you can see in the screen shot below, many more time options. It will also give you access to other ride information, like height restrictions, type and location in the park.
Important tip here; if you are booking your FastPass+ reservations right at 7:00 AM Eastern time the day they become available, speed is of the essence when it comes to those high demand attractions. Taking time to look for just the right FastPass+ reservation, may prevent you from getting one at all. We advise picking the first reservation you can find and then come back and try to modify it later. This is only for the high demand attractions. We’re thinking specifically about these attractions
- Avatar – Flight of Passage
- Na’vi River Journey
- Seven Dwarfs Mine Train
- Slink Dog Dash
- Toy Story Mania
- Test Track
- Frozen Ever After
When you get online to book your FastPass+ reservations, prioritize booking these first. You can come back and get other reservation afterwards. If you are looking at FastPass+ reservations for any of these attractions, take what you can get and be thrilled you got it.
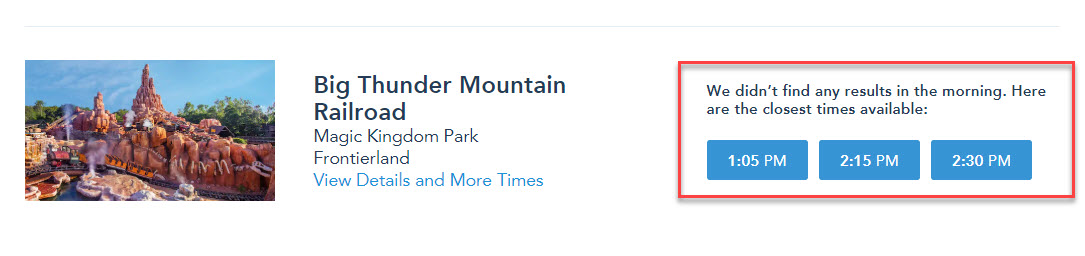
One good thing about the time filters. When you select one of the time filters like “morning”, if there are no FastPass+ reservations for an attraction it will automatically default to showing you the closest available time. You can see what that looks like to the right, where I had picked a morning time window. Nothing was available for Big Thunder Mountain, so it gave me early afternoon options to pick from.
Select Your Time and Attraction
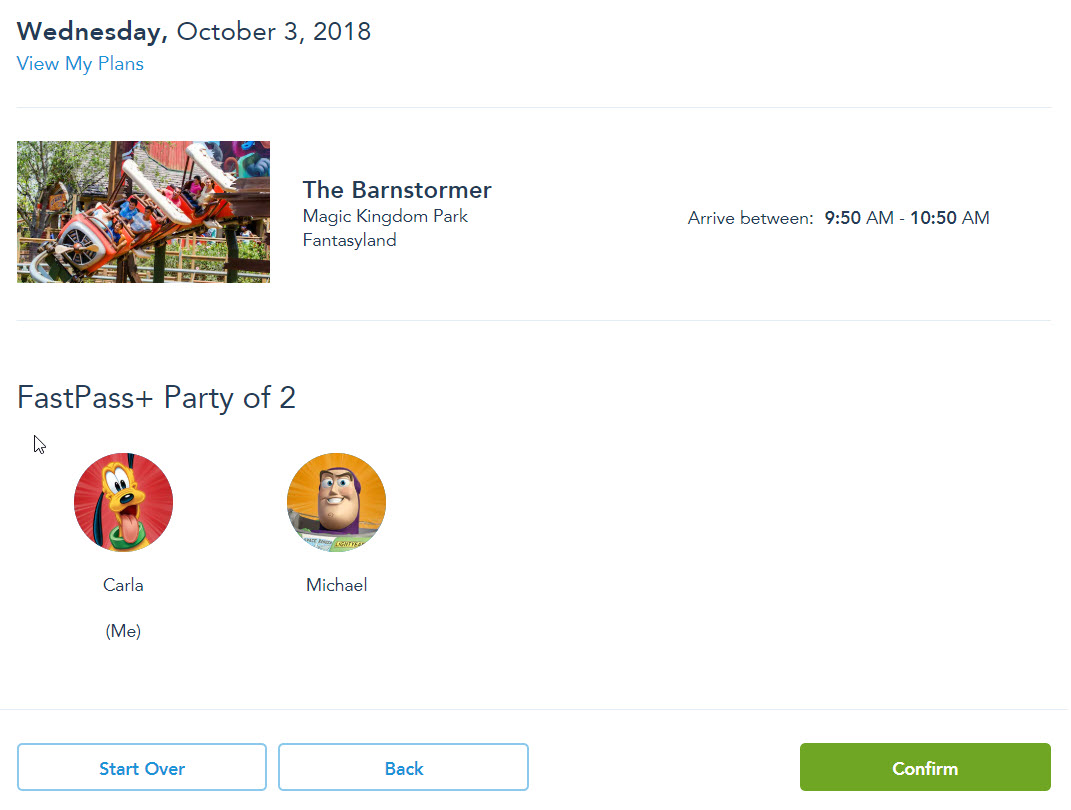
After you’ve picked your appropriate time filter, scroll down and look for the attraction you want a FastPass+ reservation for. If none of the time options work, continue playing with the time filters. If one does work, then simply click the time displayed. In this case, I want Big Thunder Mountain so, I’ll pick the 2:30 option. It will bring up a screen like the one to the right. Make sure you click the confirm button in the bottom right!
When you click the confirm button, you will get a confirmation screen telling you that your FastPass+ reservation is complete.
Confirmation Failure
For high demand attractions, sometimes you lose the FastPass+ reservation before you confirm it. This happens because the reservation is available for anyone to pick. You pick it, but so does someone else. If they hit confirm first, they get the reservation, you don’t. You’ll get an error message saying that they are unable to finalize your FastPass+ reservation. As our little Anna and Elsa would say…womp, womp, womp…
It’s not like there is only one reservation per time slot, but they do eventually run out of availability. That’s when this situation occurs. If that happens you have to start the whole selection process over. It sucks, but that’s how Disney’s FastPass+ reservation system works.
This is part of why you must be decisive and quick to click when making FastPass+ reservations. Speed is your friend and slowness or indecisiveness is your enemy.
Rinse and Repeat Booking FastPass+ Reservations
Once you have a confirmation you can do a few different things. You can close your internet browser and move on with your day, but more than likely you’re going to need to book another FastPass+ reservation. Use the two options on the confirmation page under “Want another FastPass+?”. You can select to continue on the same day or select a different day.
If you select continue on the same day, the system is smart enough to know what park you are booking FastPass+ reservations for on that day. You won’t have to pick a park again. Remember, you are limited to booking you first three FastPass+ reservations in one park on any given day.
You will have to pick your party again, as you may want to change who you are booking a FastPass+ reservation for, but everything else works largely the same.
If you choose to select another day for a FastPass+ reservation, you have to go through all the steps of picking a day and a park.
FastPass+ Reservation Conflicts
One thing you may see once you have booked your first FastPass+ reservations is a warning that you already have a FastPass+ reservation that conflicts with the new reservation you are trying to make. You can see what it looks like in the screen shot below. Easily noticeable is that you get a message saying “You already have a FastPass+ experience at this time.” However, notice on the times that one of them has a dark grey border. That is the time that has a conflict. In this particular instance, 11:35 AM is not an available time for me to pick, even though it is shown. However, the other two times are available options. You can actually select the conflicted time; however, it will make you cancel your other FastPass+ reservation if you want to proceed. Be careful here!
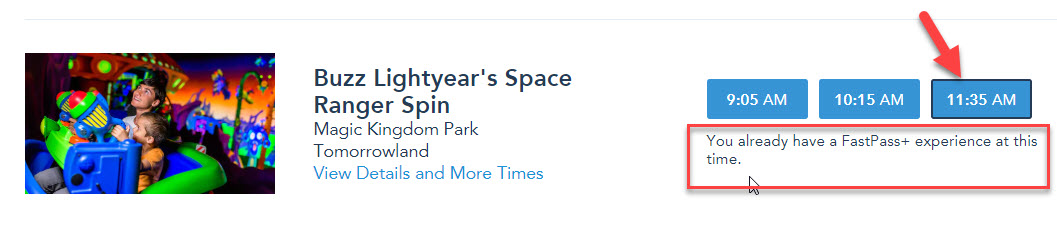
One thing that may be confusing about this is that the new FastPass+ reservation may not be at the exact same time as another FastPass+ you have already made. Yet, the system is giving you this warning. This is because FastPass+ time windows can’t overlap. Let’s say you book a FastPass+ reservation at 10:00 AM for an attraction. You won’t be able to book your next reservation until 11:00 AM. If the system pops up an option for anywhere between 10:00 and 10:59, you will get this warning.
Can’t Find an Attraction
As you book your FastPass+ reservations, you may find the attraction you are looking for is not on the list of available times. Rest assured, Disney hasn’t demolished it. Just keep scrolling to the very bottom of the attraction list.
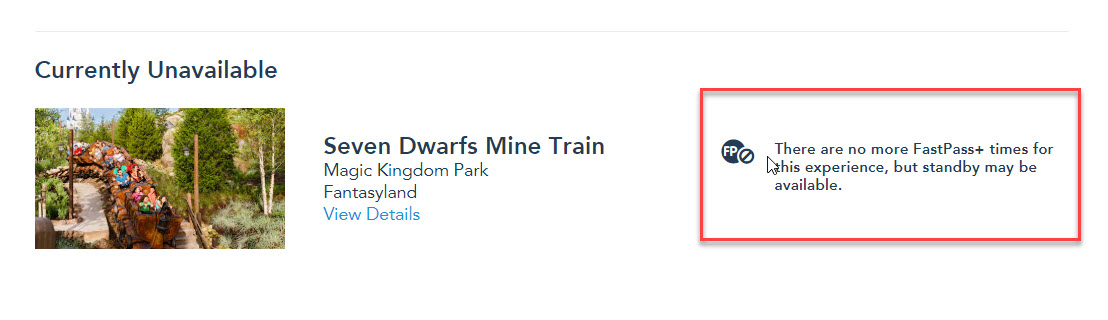
You will find it there, with the unfortunate message saying “There are no more FastPass+ times for this experience, but standby may be available.”. Many of the more popular attractions will run out of FastPass+ reservations. If they do, this is what you will see. Keep checking back every once in a while, as people do cancel reservations, and you might get some surprise availability. If that doesn’t happen, you’ll be stuck in the stand-by line with everyone who couldn’t make a FastPass+ reservation for that attraction too.
FastPass+ Tier Unavailable
As we discussed in our FastPass+ overview, Epcot, Animal Kingdom and Hollywood Studios rides are grouped into FastPass+ tiers. You can only book one FastPass+ reservation for the upper tier (Tier 1) and two for the lower tier (Tier 2). If you book a FastPass+ for an upper tier attraction, when you go back to book more reservations, the other upper tier attractions will be hidden. It will look like what you see below on the left. If you want to see them, just click the “Select a Different Experience” link. This will display the other upper tier attractions, as seen below on the right.

You can book these attractions; however you will have to cancel your other upper tier FastPass+ reservation first.
Review Your Reservations
Once you have booked everything, you can go back to the main Disney FastPass+ main page to see what reservation you have.
If you click the view details link under any particular FastPass+ reservation, you can see all the pertinent information for it. You can also use the options show to modify the reservation, cancel it or add more guests to it. Adding guests may not be available if there are no longer additional FastPass+ reservations available for that attraction at that time.
A Word About Disney Technology
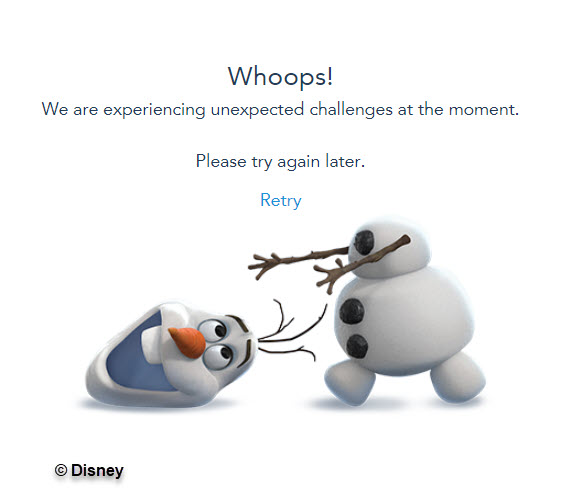
One thing you should know about Disney technology. It stinks. For a multi-billion dollar company, you would think that they would have some of the best technology out there. It is not uncommon to get messages featuring Stitch saying that something ate the page you are looking for or Olaf losing his head. Or maybe you click an option and the cursor just spins and spins doing nothing. This is not uncommon during the early morning rush of people trying to book FastPass+ reservations. Once that rush passes, performance seems to get better.
Nevertheless, the process can sometimes be frustrating, especially when it costs you one of those sought out reservations. You just have to roll with it. Don’t let the frustration slow you down. It may prevent you from getting more of those desired attractions and times.
Using the My Disney Experience App
Now let’s talk about how to make a FastPass+ reservation in the My Disney Experience App. It’s one of the most important apps you can have for your Disney World trip, so you should get familiar with it. If you are interested in apps for your trip, you can find all of our recommended apps on our Essential Apps for a Disney World Vacation article. (need to link once posted)
We will skip some of the basic stuff like logging in now and just focus on how to make a FastPass+ reservation. If you can book reservations on your phone, we assume you can handle that. Pretty much all the nuances remain the same, like selecting time filters or the warning messages you get. We’ll skip that too. This will be a pretty focused section on navigating through the screens in the app and some layout notes.
To the right is the screen you come to first when logged into the app. Start by clicking the Get FastPass icon we have highlighted on the screen.
Create Your FastPass+ Party
You do have to select your FastPass+ party, just like the desktop version, it just looks slightly different.
Pick Your Date and Park
Same rules apply here. You have to pick the day and then the park you are going to. Tap, tap and you are on to the next screen.
Pick Your FastPass+ Time and Attraction
When it comes to picking times and attractions, all the same concepts apply here. It’s just laid out slightly different.
You’ll find the same time filters at the top of the screen. In the screen shot to the right, you will notice that there isn’t a drop down for specific times. Rather you just have to scroll to the right and it will display all your time options.
Once you find a time and attraction that works, just click on the time option. It will bring up a summary of the reservation with the confirm button below. Make sure you click confirm.
After that, it is really just rinse and repeat.
Mobile vs Desktop for Booking Your FastPass+ Reservations
As you are thinking about how to make a FastPass+ reservation, you may be wondering if it is better to do it with the mobile app or on your desktop computer. There are a couple of things you should consider.
Platform Stability
First is stability of the platform. We have not had any performance issues with the mobile app for booking FastPass+ reservations. However, we have had issues with other parts of the app locking up or crashing. We already highlighted the issues we’ve had with the desktop website, so we won’t rehash that. Vote here goes to mobile, but just barely.
Comfort and Ease of Use
Next you should think about what you are most comfortable using. If you are a mobile device or app neophyte, you may want to stick to the desktop website. You need to be comfortable so you can navigate swiftly through the screens. This will allow you to snag all of those in demand FastPass+ reservations. If you aren’t comfortable with the app, stick to the desktop.
Connectivity
Finally, how is your internet connection? We’re talking about speed and availability. If you want to use your mobile device to book your FastPass+ reservations make sure you can be connected wherever you are. No connect, no reservations! Or your mobile device may be your only connection if you don’t have home broadband. This makes the choice easy. If your home broadband connection is pretty slow, but you have a blazing fast LTE connection on your phone, that may be a reason to use the mobile app. You don’t want a slow connection keeping your from getting the reservations you need.
There isn’t really right or wrong answer here. Regardless of which way you choose, make sure you get on the website or in the mobile app and tour through it. Get comfortable with what the screens look like and how to navigate. You don’t want your first time to look through it to be two minutes before you start to book your FastPass+ reservations. That will likely not end well.
One thing to note, is that if you want to book a 4th or 5th FastPass+ reservation, you can only do that in the park. While you can get these reservations, by going to a kiosk in the park, you are better served by using the mobile app. Take that as another reason to get familiar with how to do it.
FastPass+ Guides for Each Park
Now that you know how to make a FastPass+ reservation, you may be wondering what you should book. Make sure you check out our FastPass+ guides for each park. They’ll give you the low down on what you need to know when it comes to FastPass+ reservations in each park. We’ve put links to the guides below:
Disney’s Animal Kingdom FastPass Guide
Hollywood Studios FastPass Guide
Wrapping up How to make a FastPass+ reservation
And with that, we’re finished up showing you how to make a FastPass+ reservation. It is truly a fairly simple process. You just have to know some of the FastPass+ rules and idiosyncrasies of the system. Make sure you familiarize yourself with the navigation before hand and you will be just fine. Happy booking!