Using the Disney Website (My Disney Experience)
Main Navigation
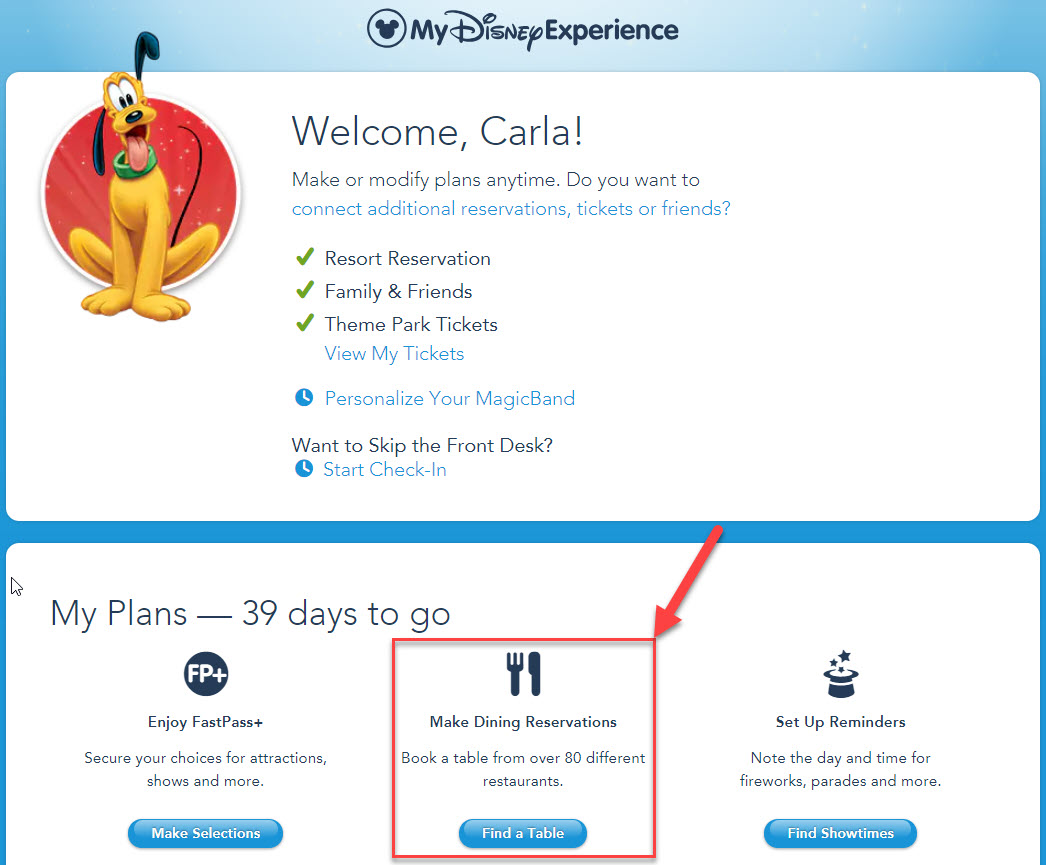
To get started, go to the My Disney Experience website. If you’ve gotten to this part of our guide, we’re going to assume you already have a My Disney Experience login. Once you are logged in, you’ll see a screen like the one to the right here. Look for the “Make Dining Reservations” section and click on the “Find a Table” button. We’ve highlighted that area in red in the image to the right.
Dining Option Filters
Next, you’ll be taken to the main dining page. This is where you can find lots of options as you figure out how to make a Disney World dining reservation. At the top of the page you will see a few filters to help you pare down your dining options. We’ve found some of these more useful than others. Below is a screen shot of the filters and followed by a short summary telling you what each filter does. Some are more obvious than others.
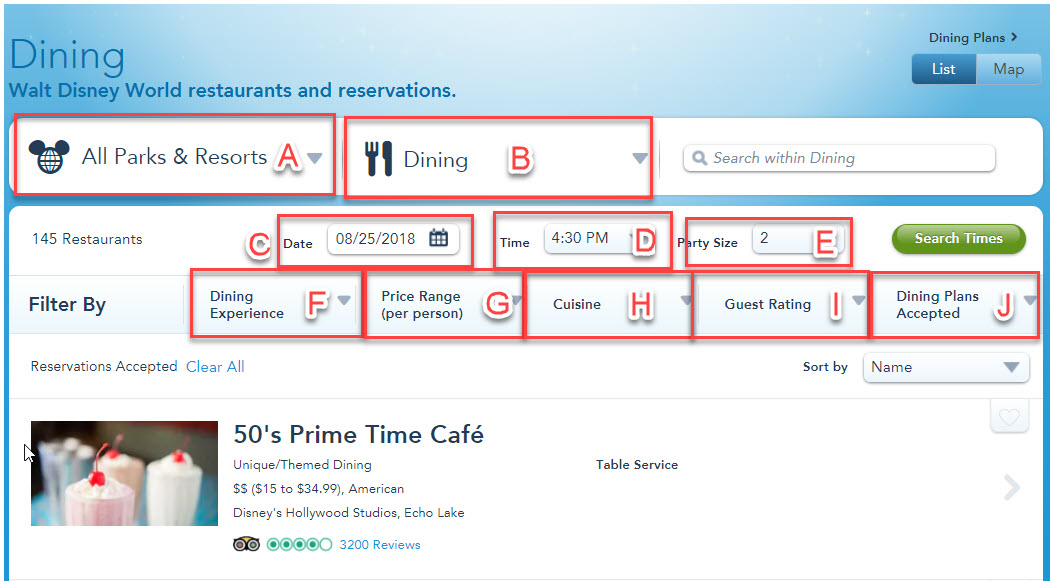
- All Parks and Resorts – Use this filter to limit the location of the restaurants. You can pick from any of the parks, resorts, and other locations throughout Disney World
- Activity Type – This is a filter on the page, but you should not change it if you want to make dining reservations. Leave it as is.
- Date – Use the calendar to pick the date of your Disney World dining reservation. You can only book dining up to 180 days in advance.
- Time – Pick the time you would like a Disney World dining reservation at. The dining reservation times available in the filter are in 30-minute increments.
- Party Size – Use this to select the size of your dining party. For larger groups, you will likely have to call to get dining reservations. We’ve had mixed experiences with availability on the website booking a group of 10. We called the restaurant directly and they were able to accommodate us.
- Dining Experience – The phrase “dining experience” is a bit vague. This is a filter that allows you to slim down your list of Disney World dining reservation options based upon several unrelated criteria. You can actually pick more than one of the options. We put a screen shot of the options to the right.
- Price Range – Use this to filter based upon estimated costs. The costs shown are usually per adult. Kids pricing will almost always be lower than what is displayed. The cost ranges are for an entrée, excluding drinks and desserts. There are four price ranges available for sorting. They are Under $14.99, $15 to $34.99, $35 to $59.99, and $60 and above.
- Cuisine – Looking for a particular style of food? Use this filter to only see options that match the style of food you are interested in. As of this publishing, there are 25 styles of cuisine listed to sort by.
- Guest Rating – This is the guest rating, as shown on Trip Advisor for each respective restaurant.
- Dining Plans Accepted – If you’re looking for a restaurant that takes a particular Disney Dining Plan, use this filter to sort. They have options for Quick Service Dining Plan, Dining Plan, and the Deluxe Dining Plan. Make sure you know what year you are booking in, as the plans are split by year.
Once you have selected any relevant filters, click on the green button that says “Search Times”. This will return all the restaurants that meet the criteria you specify.
Selecting a Restaurant
After the search returns all restaurants that meet your criteria, you’ll be provided with reservations that are around your desired time. As you can see in the screen shot below, some reservation time options are very close to our desired time (6:00 PM), while others are very far away.
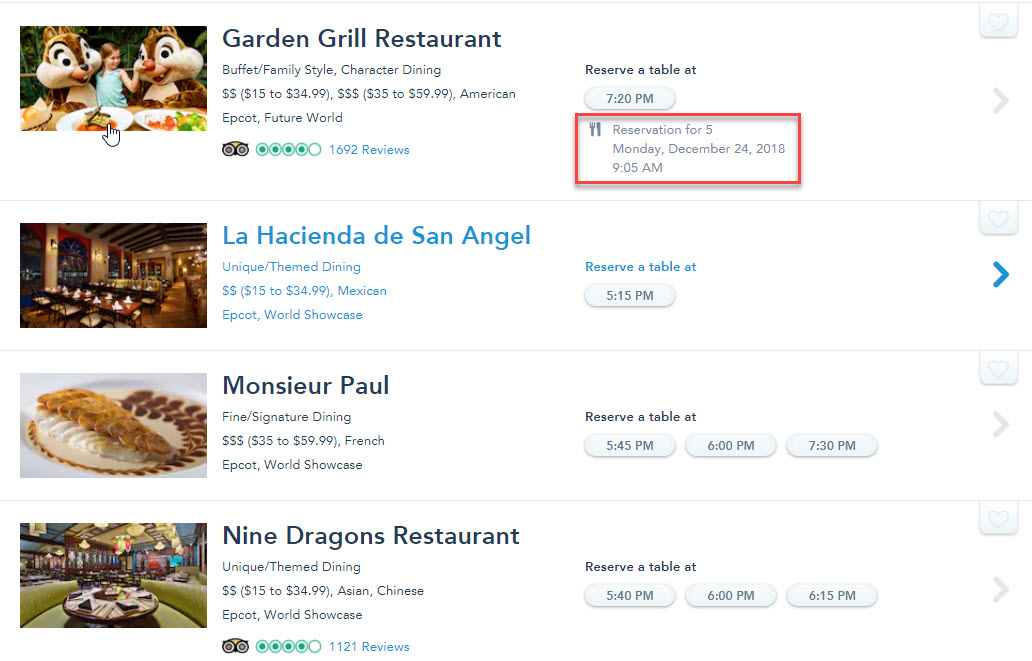
The other thing that is a useful feature is that the system will tell you if you already have an existing reservation at a particular restaurant. This is helpful in making sure you don’t book a restaurant twice. This article is all about how to make a Disney World dining reservation, but not how to do it twice! You can see the warning in red in the screen shot above.
Once you have found a restaurant and a reservation time you like you can go a couple of different ways to finalize your Disney World dining reservation.
If you want to know more about the restaurant before selecting a reservation time, then click on the restaurant name or anywhere in the section that lights up blue. You can see that in the image above for La Hacienda de San Angel. When it turns blue, click it. In this case, I’m picking the Coral Reef restaurant.
If you know you want that specific time and that specific restaurant, then just click on the time you want. You can skip the next section on “Review the Restaurant” and head to “Select and Confirm Dining”.
Review the Restaurant
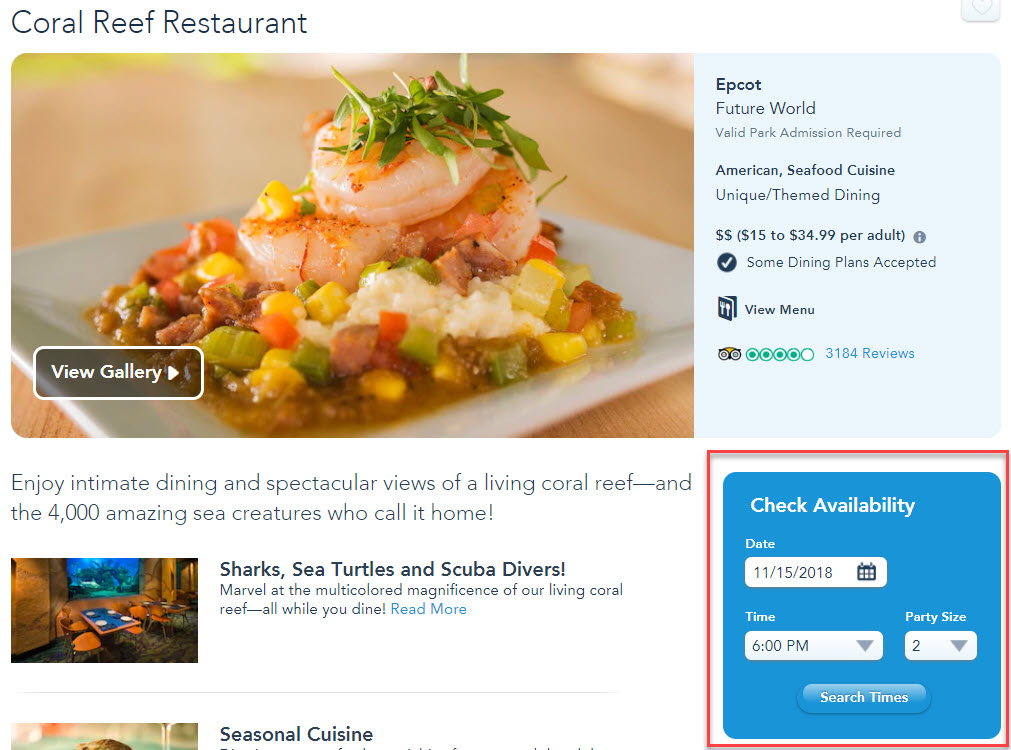
You will then be taken to your selected restaurant’s specific web page. You can read more about the particular restaurant to make sure it is right for your group. One of the important things you will find a link for on this page is a restaurant menu.
Your dining filters should carry through to the restaurants page. You can see them to the right here. Make sure your criteria are still correct in the check availability box and then hit the “Search Times’ button.
It will return a few time options for your meal. Select the time that you want your dining reservation for.
Select and Confirm Dining
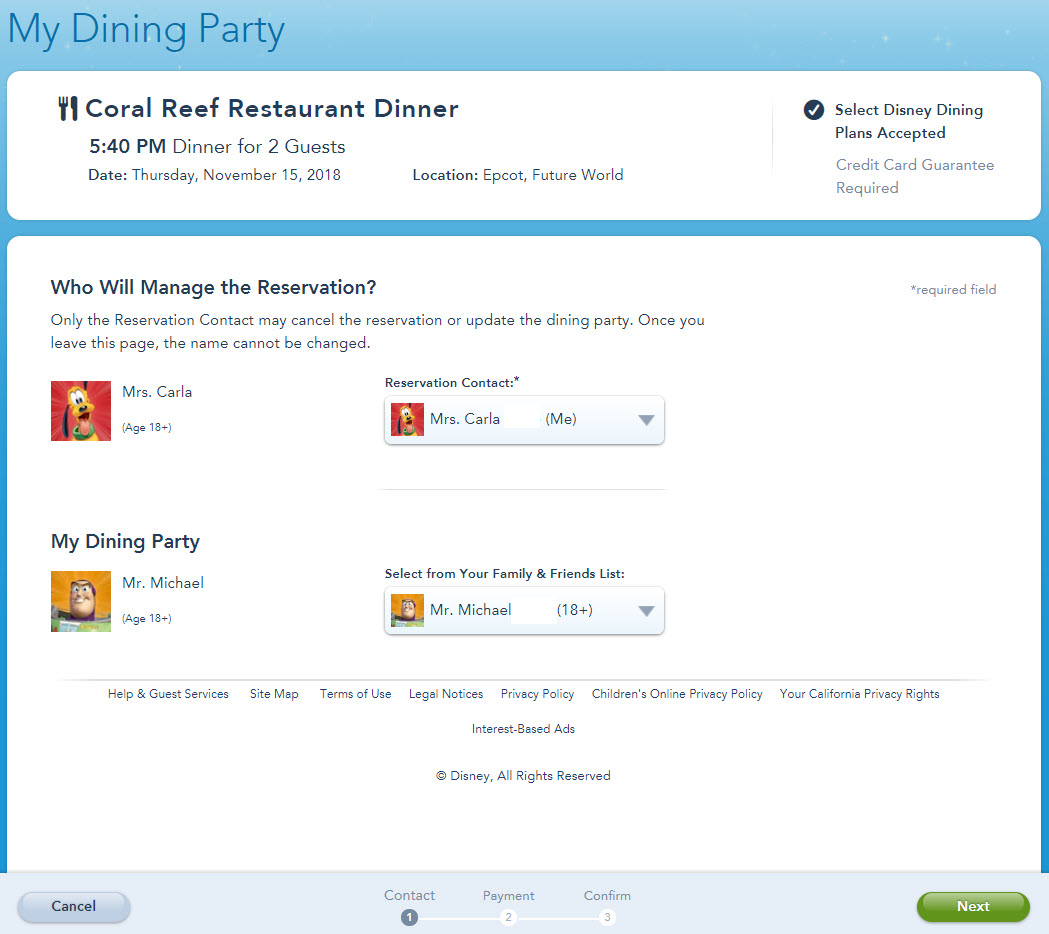
This will start the reservation confirmation process. You’ll be taken to a screen that look like what you see to the right. You will need to pick the members of your dining party. You can also see that it tells you what Disney Dining Plans they accept and if a credit card is required to guarantee the reservation, in case you no-show.
Notice the statement that the first person selected is the reservation contact. Only they can change or cancel the reservation, so be careful who you pick.
When you have your party selected, click next in the green button on the bottom right. You’ll be taken to a credit card information page. Here you will provide a credit card to guarantee the reservation. Your card will on be charged if you no-show or cancel without enough notice. They usually require 24 hours notice, but some restaurants can be different. Check your specific restaurant details. The email confirmation you get for the reservation will also tell you the cancellation policy.
Special Requests/Dietary Restrictions
Once you have provided a credit card to guarantee the reservation (if it is required), then you will be taken to the final confirmation page. On this page you will be asked to provide contact information for the reservation, in the form of an email address and phone number.
What’s more noticeable and important may be the section that says “Special Requests”. Click add and it will take you to the screen on the bottom right below this section. There you can see all the special requests that you can make at time of booking a reservation. This serves to notify the restaurant that someone may have a food allergy or other issue related to certain foods.
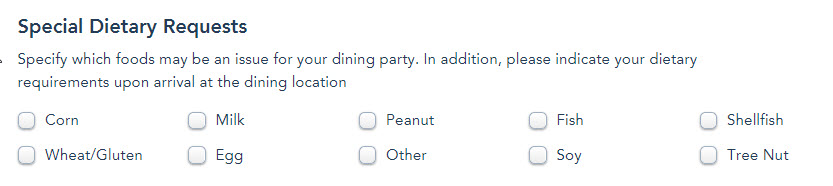
You should still confirm with your host or hostess that they are aware that someone in your party has a food allergy. In our experience, whenever we put Carla’s gluten intolerance into the system, the host or hostess is aware of it. Your waiter will need to know who has the allergy as well. They should ask you, but if they don’t, make sure you inform them.
While not shown here, there is also a place to request special seating if someone in your party requires to stay in their wheelchair while dining. Just scroll down the page a bit and you will see it.
Confirm Your Disney World Dining Reservation
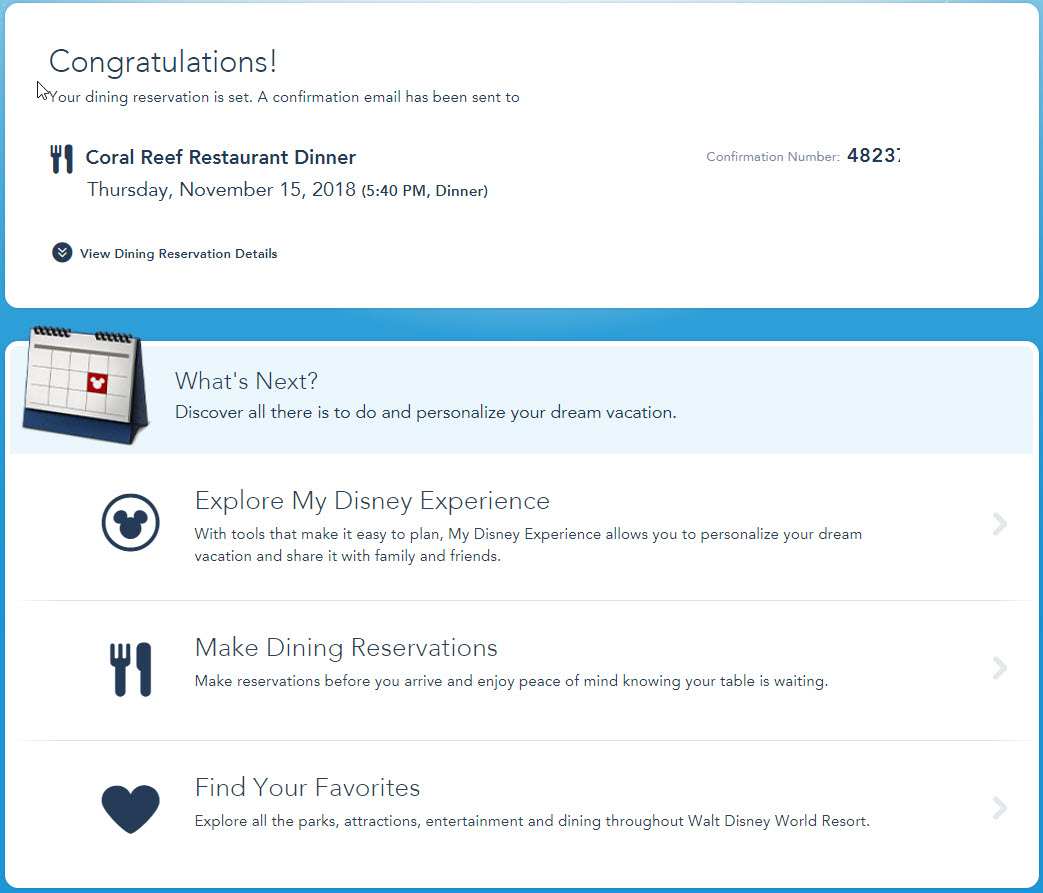
After providing any special requests, go to the bottom of the screen and make sure you check the box to confirm your acceptance of the guest policies. Then click the box to confirm your reservation. Once you hit confirm you will be taken to a page that shows all the relevant information about your Disney World dining reservation. See an example to the right.
You will get an email confirmation of the reservation. It will be sent to the email you provided right before you confirmed the reservation.
After that, you can click on any of the options below the confirmation details to book another dining reservation or explore other areas of My Disney Experience.
This wraps up how you make a Disney World dining reservation on the Disney website. Not overly complicated and we don’t generally find it to be as glitchy as the FastPass+ system.
Using the My Disney Experience App
Now we’ll look at how to make a Disney World dining reservation using the My Disney Experience app on your mobile device. A lot of the rules, filters, etc are the same, so we won’t rehash that. We’ll focus you on navigation and how to select what you want.
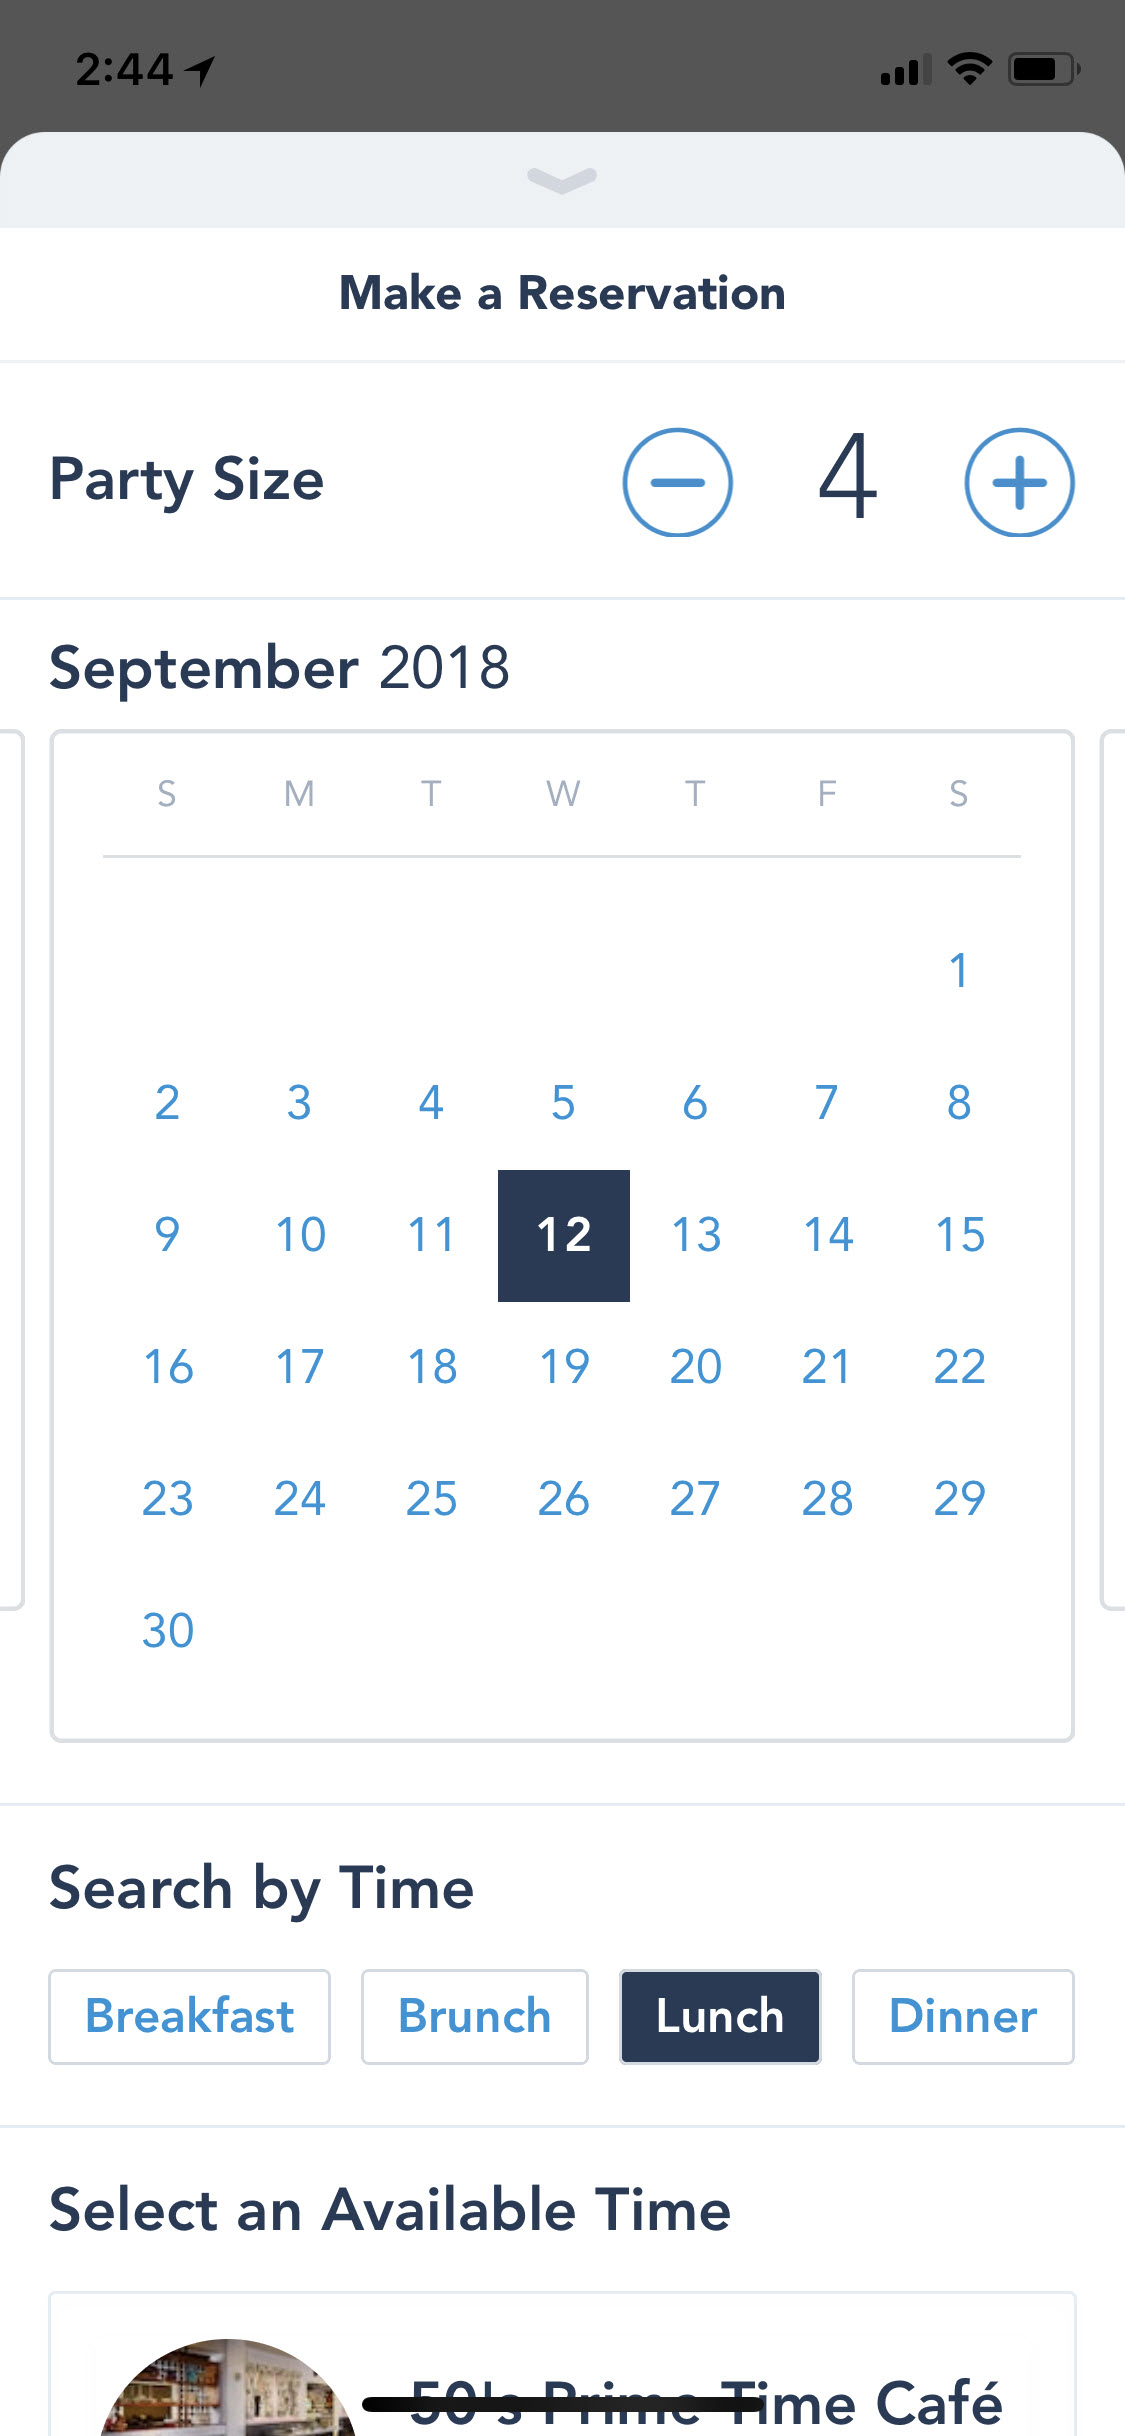
Select Party Size, Date, and Time Preference
These parameters should sound very familiar from the filter review on the desktop website. You need to provide your party size and then the date you want to dine on. To see additional months, his scroll to the right in the app. Remember, you can go as far as 180 days out.
Once you select a date, you will be given an option to pick a time. The default view in the app makes it look like you can only pick breakfast, brunch, lunch and dinner as your time preference. However, you can just scroll to the right to see specific time windows of availability. Much like FastPass+ reservations, you can pick 30 minute increments of time to search by.
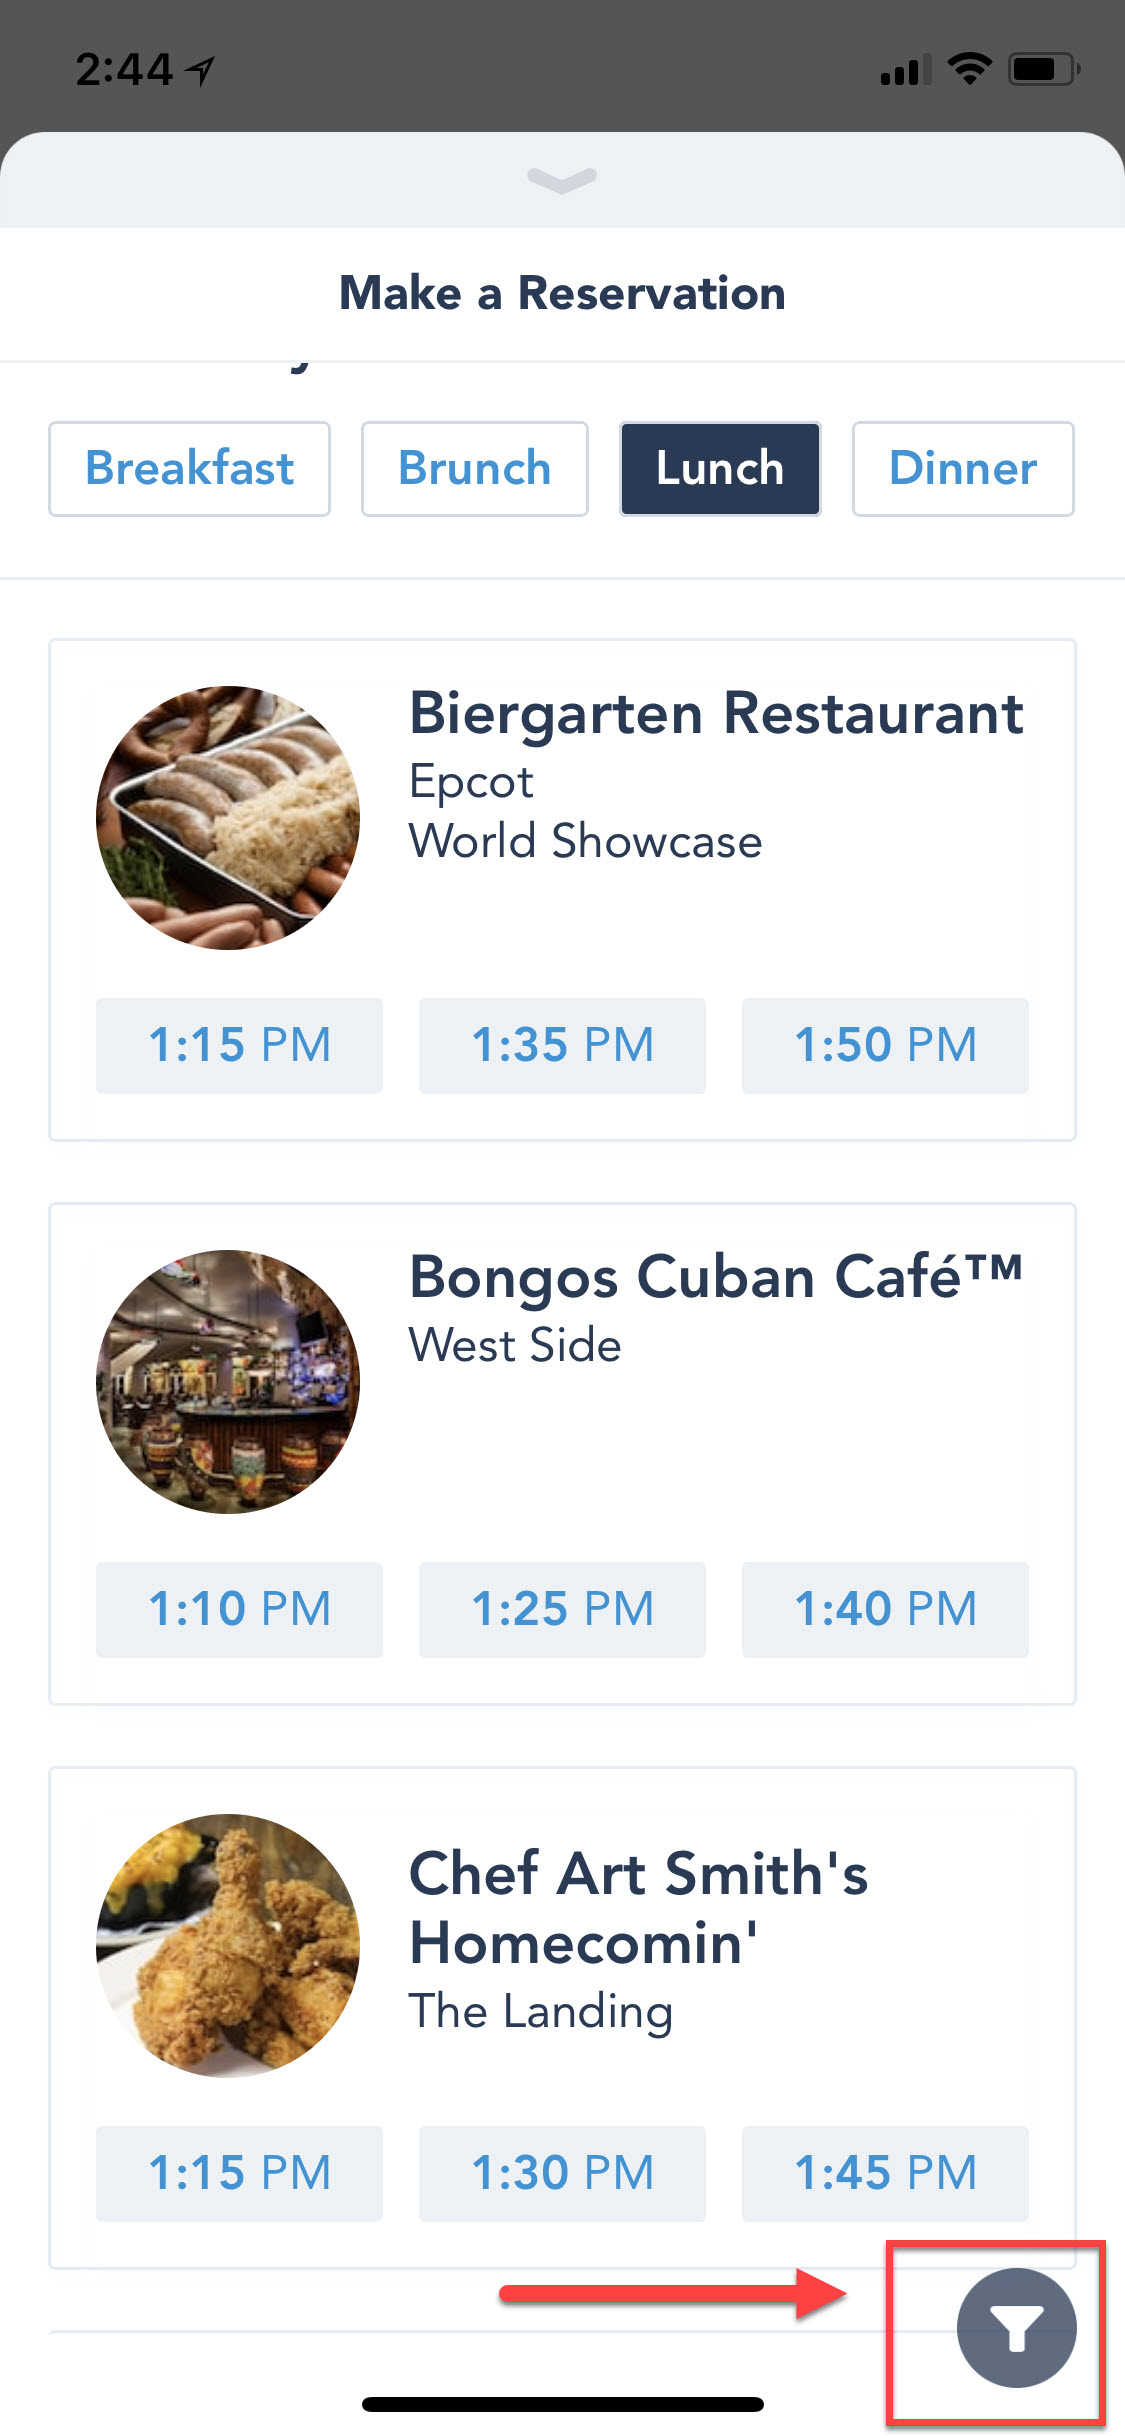
After you pick your time window, the app will display all dining reservations available that meet these basic criteria. The app automatically filters based upon these criteria. You don’t have to hit “done” or any other buttons.
Dining Option Filters
When the available restaurants and times pop up, you’ll notice a little funny icon in the bottom right hand of the screen. You can click this icon to select the other filters you were able to pick in the desktop website. Just scroll down on the top part of your screen to see all available filters. If you don’t see a filter selection you think should be there, click the “More options” plus sign to display what else…more options.
You have all of the same filter options available to you on the mobile app that you had on the desktop website.
After you’ve selected all your filters, click done in the top right corner. This will trigger the app to filter down your options to those meeting the criteria you just selected. If you don’t click done here, you’ll be waiting a very long time for the app to do something.
Select and Confirm Dining
After your dining list is filtered down, to make a Disney World dining reservation you click on the time button that corresponds to the reservation you want.
You’ll be taken to a review and confirm page. Here you’ll provide you reservation contact information, credit card for the guarantee and provide any special requests. Just click on the “Add a Special Request” button. Then you can provide any food allergies or request special wheelchair access.
Check the box saying you agree to the guest policies and hit the “Book Now” button at the bottom of the screen to finalize make a Disney World dining reservation.
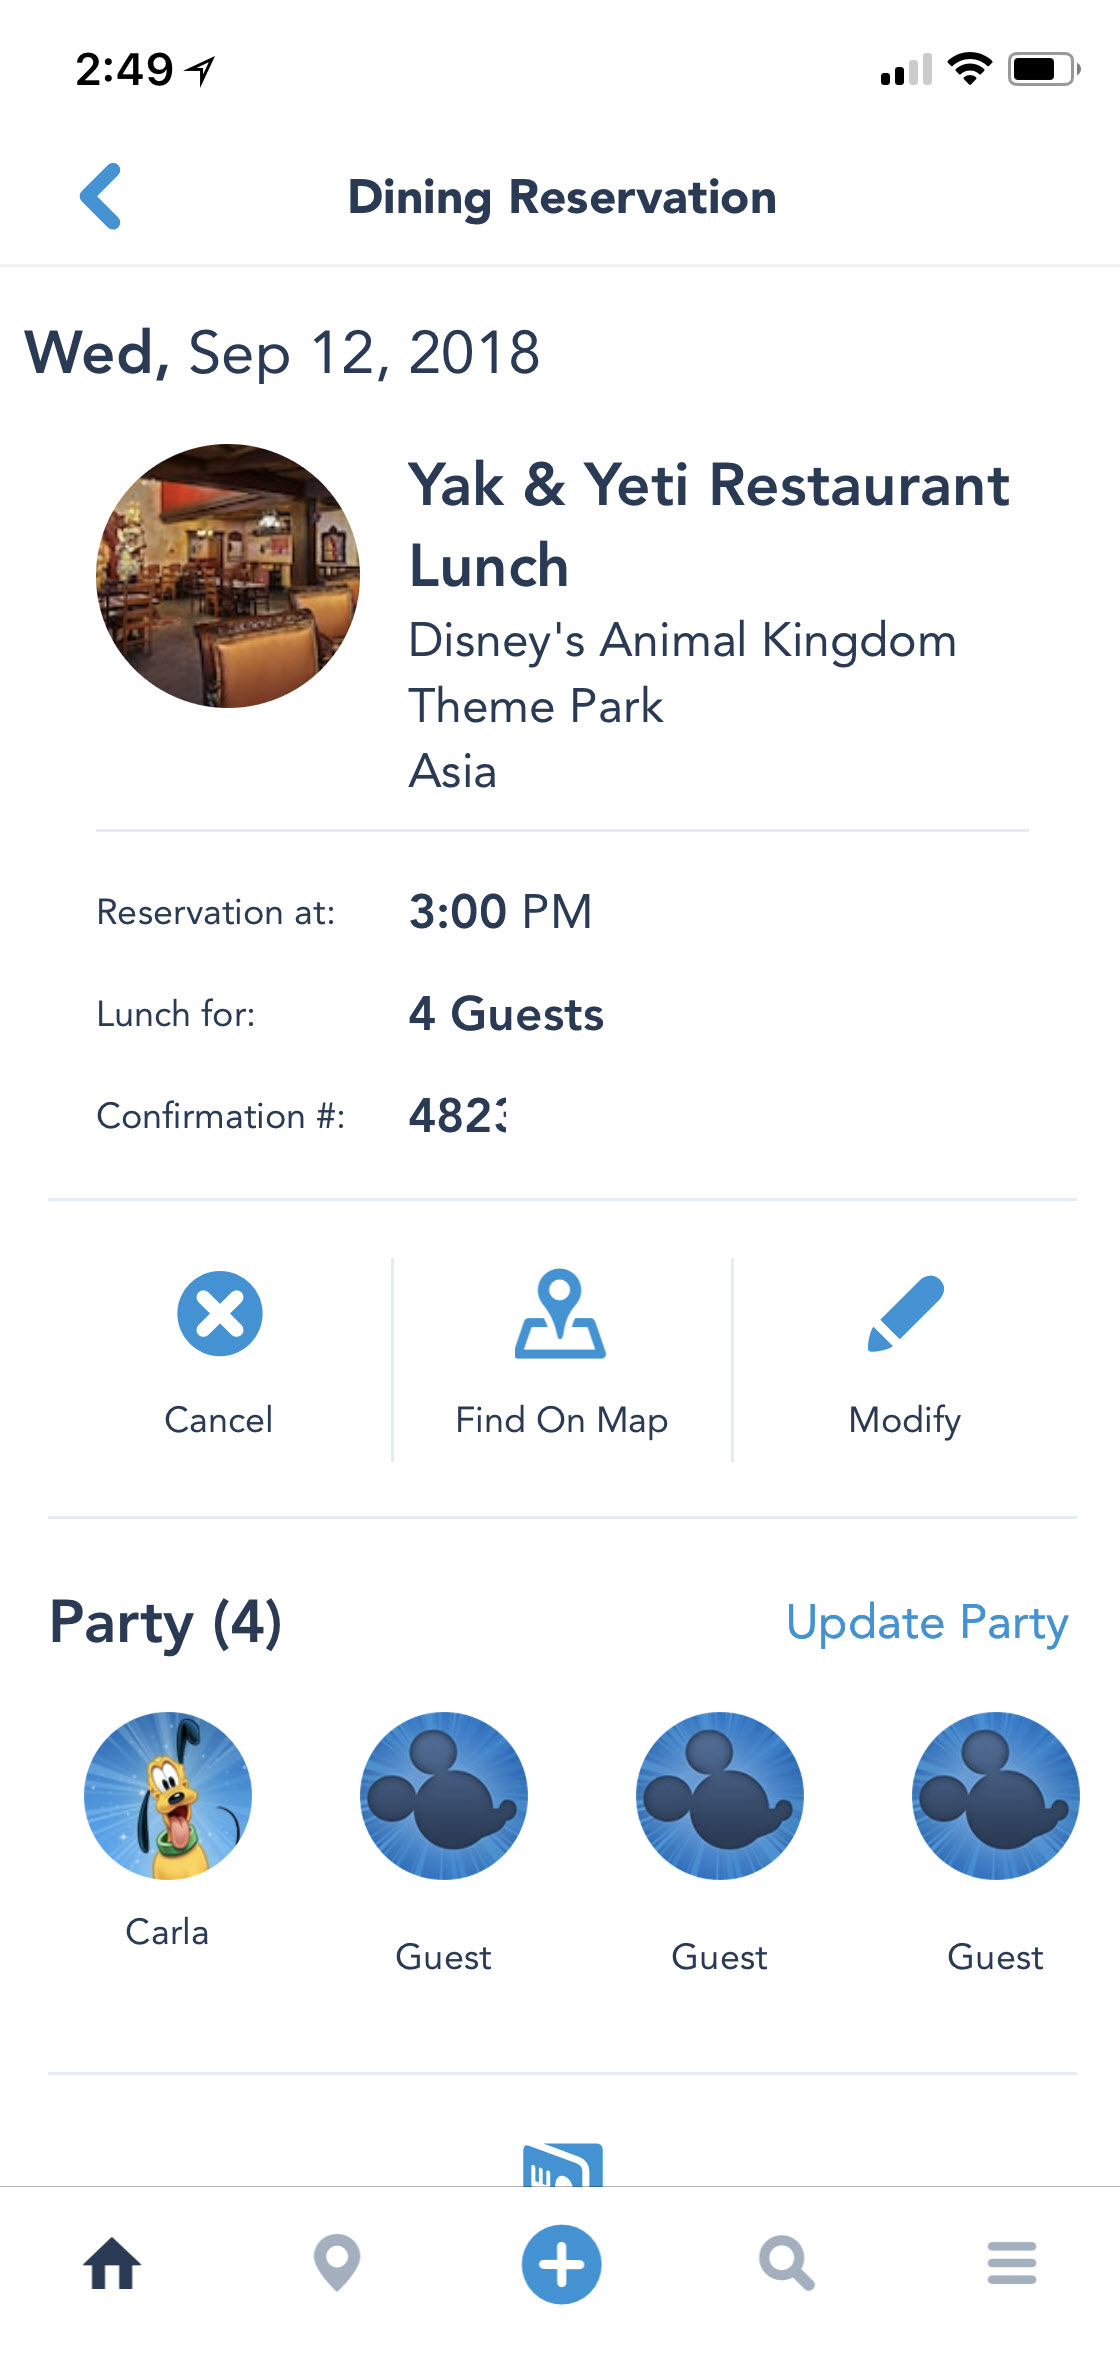
You’ll see a confirmation screen like the one to the right and then you’d done.
A Phone Call
If you still don’t feel comfortable with how to make a Disney World dining reservation using the mobile app or the desktop website there is still an option for you. You can pick up the phone like it was done before the days of the internet. A friendly Disney cast member will help you make a dining reservation. Call Disney at (407) 939-3463 to make you reservation.
Wrapping it Up
And just like that we’re done showing you how to make a Disney World dining reservation. Both the mobile and desktop browser-based versions are pretty easy. We think the mobile device is a little more streamlined, but other than that they offer the same utility.